ArcaOS 5.0.4 introduced the ability to update from a prior 5.0 release. To better understand how this works and what to expect, we’ve compiled this wiki page. Please read this before attempting to update your system, as we continue to refine it to address known issues and potential pitfalls.
On this page
Versioning in ArcaOS
major version . minor version . release
ArcaOS began with version 5.0, which was the first generally available (GA) version of the product. There was no “release 0” specified, though this was implied. Thus, the oldest GA version of ArcaOS is 5.0, available May, 2017.
Update vs Upgrade vs Migrate
All three possibilities (update, upgrade, migrate) require the same language to be applied. A change of language is a completely different issue, separate and apart from the level of the code.
An update takes a system at the same major and minor version (5.0.1) to a newer release (5.0.7) for the same boot mode (traditional BIOS or UEFI) and language. Thus, 5.0.1 English may be updated to 5.0.7 English. (Through ArcaOS 5.0.8, all ArcaOS releases have been English-only.) Likewise, 5.1.0 German traditional BIOS may be updated to 5.1.1 German traditional BIOS, and 5.1.0 Spanish UEFI may be updated to 5.1.1 Spanish UEFI.
An upgrade starts with one major and minor version (5.0) and moves to a newer major or minor version (5.1) for the same boot mode (traditional BIOS or UEFI) and language. Examples here would be upgrading ArcaOS 5.0.2 English traditional BIOS to 5.1.3 English traditional BIOS or 5.1.3 German UEFI to 5.2.1 German UEFI.
A migration starts with any previous OS/2 GA release, from any supported vendor, bringing that to the latest version of ArcaOS of the same language. As currently planned, previous OS/2 GA releases for this purpose would be Warp 4, FixPak 13, MCP, MCP2, or eComStation 1.x or 2.x. This capability is not yet available as of this writing.
Arca Noae does not recommend or support changing the boot mode of an installed system from traditional BIOS to UEFI or the other way around. If you must change boot modes (to be able to run DOS or Win-OS/2 sessions on the same hardware, for example, where these sessions do not function properly under traditional BIOS), Arca Noae recommends backing up, making BIOS changes to enable the other boot mode (UEFI, in the example just cited), installing fresh, and restoring data to the new installation. Arca Noae specifically does not support live conversions between boot modes, and will not respond to tickets for problems arising from such manipulations. The ANCS (Arca Noae Compatibility System) was designed to be installed with a new installation and not applied to an existing installation.
The update and upgrade process
Both the update and upgrade process starts with the user ensuring that the system to be updated (the candidate) meets the minimum requirements, that is to say, it must have installed and functioning some release of ArcaOS prior to (or the same as) the release to be applied. Further, the candidate’s volumes containing operating system components which may be updated during the process (system, Unix compatibility subsystem, networking, home) must be clean. The candidate must be be in good functioning order (bootable, with no error messages presented by any installed software).
Before beginning the process:
- Ensure that you have at least two known-good backups of the system, in case of disaster. Most update failures are recoverable (see this wiki page for troubleshooting tips), but there may be times where recovery is only possible by restoring a backup. A backup in this instance means either a full, file-by-file backup of the entire content of the system volume (or, if a multi-volume install, the system, network, home, programs, and Unixroot volumes – in short any and all volumes created and populated during the original installation), or a partition image of the system volume (or, if a multi-volume install, all of the volumes created and populated during the original installation).A known-good desktop archive may also be useful, but is not a substitute when system files have been only partially replaced and the system needs to be returned to a fully working state.
- Ensure that PATH, DPATH, and LIBPATH statements in CONFIG.SYS are syntactically correct (LIBPATH must not have any nonexistent subdirectories, though missing full paths are acceptable) and that all three are terminated with a semicolon.
- Ensure that any conflicting, unsupported drivers (kernel, USB stack, etc.) have been removed and that only versions supplied with or as updates to ArcaOS from Arca Noae are installed. Conflicting kernel files and device drivers will cause the update to fail.
- Ensure that any copies of REXXLIB.DLL you may have in LIBPATH ahead of \sys\dll have been renamed or removed. (There are other REXX libraries by that same name which are not interchangeable, and only the REXXLIB.DLL shipped with ArcaOS is usable by the updater. Any other REXXLIB.DLL will cause the update to fail.
- Ensure that any software started from STARTUP.CMD or any of the candidate’s desktop startup folders which may prevent the system from being automatically rebooted and returning to the desktop is temporarily disabled or the object(s) moved to a safe (non-automatically-executing) folder.
- Ensure that the desktop lockup feature (lockup on start) has been disabled if Doodle’s Screen Saver is not installed. You may re-enable it once the update procedure has completed. (If Doodle’s Screen Saver is installed, it will be disabled by the updater for the duration of the update process. If the “Start screen saver on system startup” option has been enabled, it may need to be re-enabled after the update completes.)
- If you normally use Object REXX as your default REXX interpreter, use the switchrx command to restore Classic REXX, and reboot once to ensure that it has been set correctly. You may, of course, switch back after the update. (This requirement will be addressed in the 5.1.0 release of ArcaOS.)
Remember, an update or an upgrade:
- will not alter the volume layout of the candidate. A single volume installation, booting from D: will be a single volume installation booting from D: after the update or upgrade. A multi-volume configuration will remain a multi-volume configuration.
- will not reformat any volumes. A candidate which boots from an HPFS volume will continue to do so after the update or upgrade.
- will not install any optional software which was not installed originally or components provided with ArcaOS and not installed later. There are limited exceptions to this rule, where, for example, a later ArcaOS release has replaced a component which was previously distributed with ArcaOS. In short, the updater is not a selective installer. To add or remove components, use already available tools.
- will not provide a way to change the networking configuration (drivers, services, etc.) of the candidate system. Use already available tools to make these changes.
- will not provide a way to change the language of the candidate system.
- can update the same release as the release on the installation medium (5.0.7 to 5.0.7, for example, of the same language). As mentioned below, an update which is not successful on the first attempt may succeed on a subsequent attempt. Be sure to restart the process from the installation medium in these cases. The update process does not resume, it must be restarted.
- will produce the same log files as a fresh install, and these files are essential when reporting problems with the procedure.
Beginning the update or upgrade process
If an existing ArcaOS installation of the same major version and the same language as the installation source is detected on any accessible volume, Update/Upgrade previous ArcaOS installation is available for selection on the Installation Type page:
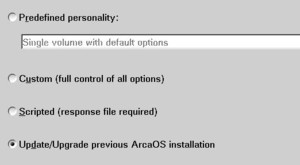
Note: If you believe that you do have one or more existing ArcaOS installations which should qualify for an update or upgrade, but the Update/Upgrade option is not available (greyed out), see the section below entitled Update/Upgrade option unavailable.
Select the Update/Upgrade option and proceed to the next page. Here, the system volumes for all detected update candidates will be listed. Select the installation to be updated, and proceed to the next page to confirm the operation and begin the actual update procedure.
IMPORTANT: IF THIS OPTION IS UNAVAILABLE (GREYED OUT), YOU CANNOT PERFORM AN UPDATE. SELECTING ANY OTHER INSTALLATION TYPE WILL REFORMAT THE SYSTEM VOLUME, RESULTING IN LOSS OF DATA.
There may be several reasons why the Update/Upgrade previous ArcaOS installation selection is not available. In order of probability, these are:
- No valid update or upgrade candidates exist on any accessible volume. In order for the updater/upgrader to consider an existing installation as an update/upgrade candidate, that installation must be of the same language as the ArcaOS installation medium. For updates, the installation must be of the same major and minor version, and the installation must be of he same or lesser maintenance release. Thus, US English 5.0.1 is a valid update candidate for US English 5.0.7. For upgrades, the installation must be of the same major version, and the installation must be of he same or lesser minor version. Thus, US English 5.0.8 is a valid upgrade candidate for US English 5.1.0.
Solution: Ensure that the ArcaOS installation(s) on the system to be updated meets the requirements of the ArcaOS installation medium.
- At least one valid update or upgrade candidate exists, but the volume is inaccessible. This can occur when the target system volume is in need of consistency checking and cannot be mounted for reading. It is important to remember that the ArcaOS installation medium does not autocheck any volumes, so a previous shutdown which was not clean may result in one or more volumes not being mounted during boot.
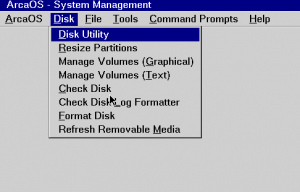
Solution: Select the Check Volumes… button from the Target volume page in the installer. The Check Volume(s) dialog will display which volumes are in need of consistency checking.
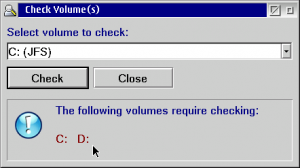
Select a volume from the dropdown as listed in the lower panel. Allow the disk checker to write corrections to the disk, and let the process run to completion. When the button is available in the results dialog, click Cancel, and then Cancel again to return to the Check Volume(s) dialog to repeat the process for any remaining volumes.
Allow the utility to check each volume in order. When finished, exit the utility and from the menu, select ArcaOS | Shutdown and reboot from the installation medium to begin the process again.
Note that it is especially important for multi-volume installations that any necessary (though non-boot) volumes be clean or the update or upgrade will fail.
- The install.flg file in the system’s \sys\install directory is missing or damaged. In this case, the updater cannot determine the level of the installed system.
Solution: Extract the archived version of this file from the latest \sys\install\install_yyyymmdd.zip present on the system. If this is not possible or the file is also damaged, contact Support.
- The release of the ArcaOS installation medium is lower than 5.0.4. The updater was introduced with 5.0.4, and no previous versions of ArcaOS have this ability.
Solution: If you have a current ArcaOS Support & Maintenance subscription, log into your account, access the ArcaOS Download Center and request a new ISO. If your subscription has expired, you will need to purchase a new one before downloading a new ISO.
A closer look at the update process
The update takes place over four phases, separated by automated reboots.
Phase 1 starts with the boot from the installation medium where the option to Update existing ArcaOS installation is selected. The existing CONFIG.SYS is moved to \sys\install\rsp and renamed CONFIG-UPD-yyyymmdd-nnn.SYS and if STARTUP.CMD is present, it is renamed in place to STARTUP.UPD. Several required files are copied to the target system and special CONFIG.SYS and STARTUP.CMD files are prepared and saved to the root of the system volume. All subsequent phases are booted from the target system. Keep the ArcaOS installation medium in place and allow the timer to elapse to automatically boot from the hard disk.
Phase 2 boots from the target system, and reads the special STARTUP.CMD to begin its work. Ordinarily, this file is then removed once Phase 2 begins. In the event of failure before the end of the phase, the system may be restarted without looping into the updater and failing in the same location. See the Troubleshooting section, below, for tips on handling unexpected happenings during Update. At the successful completion of this phase, a new STARTUP.CMD is prepared and saved to the root of the system volume.
Phase 3 again boots from the target system, and reads the special STARTUP.CMD to begin its work. Once more, this file is removed once the phase begins. As with the preceding phase, if a failure occurs before the end of the phase, the system may be restarted, however, if there was an existing STARTUP.CMD before the update, it may not have been been renamed and put back in place. Likewise, in such an event, the original CONFIG.SYS will not have been migrated and put in place.
The final phase, 4, boots the system with the new/restored boot configuration files in place. Congratulations! Now enjoy your updated ArcaOS installation.
In case of trouble
The update procedure has been well tested, but it is not infallible. Sometimes, bad things happen to good systems. If you are experiencing difficulty getting your update to complete, check the Update-related issues section on the Known issues wiki page and also see this wiki page for failure recovery steps. Remember, when reporting issues regarding difficulty with updating, log files are mandatory.
This entry last updated: by