An update may fail to complete for a variety of reasons. Note that there is a difference between an update which has abended (abnormal end), one which appears to be in a hung (stalled, or zombie) state, and one which continuously reboots to the same phase (looping). Different recovery methods are required for these different failures.
Note that in some instances, the update may appear to have completed successfully, yet some things just do not seem to work as expected following the procedure. Please check the Update-related issues section on the Known issues wiki page for some hints and tips before opening a ticket.
On this page
Hung update
The most common update failure is a hung update. In this case, during one of the four phases, the progress meter will stop moving, the text above it, which normally indicates the current operation, will remain on the last step in process at the time of the stall, and the system will appear to be waiting. Generally, the keyboard is responsive (NumLock and CapsLock will toggle, and the system can indeed be rebooted using C-A-D).
Luckily, this is generally the easiest recovery, though some care should be taken to preserve the log files before retrying the update. To do this, allow the system to reboot at the end of the looping phase, and instead of rebooting from the hard drive, boot from the installation medium again. Follow the procedures outlined on this wiki page under the section entitled Producing an ArcaOS install log (hung install) to run MkSupZip. If the system would not warm reboot (C-A-D), it may be necessary to run a disk check on the affected volumes. This may be done from the System Management console before running MkSupZip.
You may or may not need to actually open a support ticket for a hung update. Once the logs have been gathered by the MkSupZip script, restart the ArcaOS installer from the System Management menu and proceed to the Installation Types page. Select the option to Update again, and on the next page select the same update candidate. Allow the process to restart. It may or may not run to completion. If not, see the section below entitled Recovering to a bootable state.
Looping update
An update which is unable to fully complete a phase and which continues to boot back into that phase is considered to be stuck in a loop. There is the self-imposed loop, of course, where the user does not allow the update to boot from the hard drive for phase 2, and thus continuously requests an update of the system (this is not a looping update). Instead, a looping update is one where the phase (2, 3, or 4) boots from the target system volume, proceeds with at least some of its work, the system reboots, and apparently begins the same phase again.
Essentially, this is a hung update (see above) without the hang. The resolution is similar to that described above for a hung update, but will usually require a trouble ticket to resolve, and possibly a restore from backup to return the system to a usable state until the update may be completed. In most cases, a minor configuration change will be needed for the system before attempting the update procedure, and the edit “undone” at the conclusion of the update.
Reboot the system (using C-A-D, if at all possible). Follow the procedures outlined on this wiki page under the section entitled Producing an ArcaOS install log (hung install) to run MkSupZip. If the system would not warm reboot (C-A-D), it may be necessary to run a disk check on the affected volumes. This may be done from the System Management console before running MkSupZip. Be sure to attach the log file zip to your ticket as described on the wiki page.
Abended update
There are conditions which may trigger an abend during the update. In this case, an error message will be presented and the update procedure will stop. An abend log set (install_abend.zip) will be created in \sys\install.
Recovery from this condition may or may not require a complete reinstall, depending upon when the abend occurred, what files had been updated, and the resulting state of the target (candidate) system. In most cases, a support ticket will be required. Be sure to attach the install_abend.zip to your ticket. It is generally not recommended to restart the update procedure following an abend until the cause of the abend can be determined.
Odd behavior during or after an update
Generally, odd happenings during an update (failure to automatically reboot, failure of various items to start from the System Management console menu, unexpected windows opening, etc.) may be attributed to PATH or LIBPATH inconsistencies, where the installer and its related utilities are unable to find or load various components necessary to proceed. In some instances, the update will proceed (usually with some manual intervention, such as a C-A-D keypress to restart the system to the next phase), however, once the update process has completed, the system may not perform as expected (various applications may not start or run, an obvious indication that something has gone wrong).
It may be possible to simply run the update procedure again to properly complete the process. Before doing so, however, ensure that the PATH, DPATH, and LIBPATH statements are syntactically correct and are all terminated with a semicolon. (See the section entitled Before beginning the process, on the Updating from a prior release wiki page.) Note that in some cases, it may be desirable to restore the system to its pre-updated state and begin the update procedure again.
Recovering to a bootable state
As previously mentioned, during the update procedure, the existing CONFIG.SYS and STARTUP.CMD (if present) is/are renamed and special files created for the purpose of performing each phase of the update. In the event of a failure, the “normal” CONFIG.SYS and STARTUP.CMD must be renamed in order to restore a proper boot configuration. This may be done in several ways.
If the desktop archiving feature has been enabled, this method has the added benefit of restoring the desktop to a usable state, in case the failure occurred during a desktop operation.
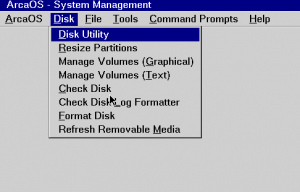
If that is not available (or outdated), booting from the installation medium again and accessing System Management is a good alternative. Start by performing a disk check on all potentially affected volumes (the ArcaOS installation medium does not autocheck any volumes during boot).
From the menu, select Disk | Check Disk. The Check Volume(s) dialog will display which volumes are in need of consistency checking.
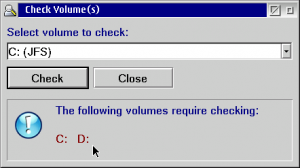
Select a volume from the dropdown as listed in the lower panel. Allow the disk checker to write corrections to the disk, and let the process run to completion. When the button is available in the results dialog, click Cancel, and then Cancel again to return to the Check Volume(s) dialog to repeat the process for any remaining volumes.
Allow the utility to check each volume in order. When finished, exit the utility and from the menu, open an OS/2 or 4OS/2 window and change to the boot volume on the (failed) target. Copy \sys\install\rsp\CONFIG-UPD-yyyymmdd-nnn.SYS to \CONFIG.SYS and if present, \STARTUP.UPD to \STARTUP.CMD.
Either of these methods (desktop archive recovery or disk check and manual copy) should get the system to a bootable state if the failure was non-critical. In the case of a hung install, it is advisable to retry the update procedure as soon as possible. In the case of an abended update, the cause of the abend should be investigated and corrected before retrying the update.
When recovering to a bootable state from a failed update, the system should not be considered to be finished or in any way stable. Arca Noae does not provide support for subsequent failures (unrelated to updating) for systems left in such an inconsistent state.
Update stops at the beginning of phase 2 when updating from USB-attached media (AltBoot)
A hang encountered at the beginning of phase 2 of the update when using USB-attached media may be due to a mismatched USB stack in the existing installation, specifically, an unexpected USBMSD driver. Generally, this causes the mounting of the ISO located on the stick to fail, as the stick content does not refresh as expected, and thus, the ISO cannot be located. This will be noted when the desktop has initialized and a command window is visible on screen.
Avoidance
Before updating, ensure that this driver matches what was either previously delivered with the ArcaOS release being updated or, if the existing USB stack is 12.04 or newer, matches the ArcaOS USB stack version (the BLDLEVEL utility will display this). (See the section entitled Before beginning the process on the Updating from a prior release wiki page.)
Workaround during update
It should be possible to replace the single driver and reboot to start phase 2 of the install. If the proper version cannot be found, it is best to restore the system to its pre-update state, mount the ArcaOS ISO, and (for versions of ArcaOS 5.0.5 and later), install the USB stack package from \CID\SERVER\ARCAPKG on the ISO (this is a WarpIN package; simply browse to it from the Drives folder and double-click).
Internal Processing Error encountered during phase 3 boot in VirtualBox VM
If you have ever installed AMouse under VirtualBox and later changed to the VBox mouse driver, this hang may occur when AMOUSE.SYS is loaded in memory first, and VBOXMOUSE.SYS attempts to load later.
Avoidance
Even if the AMouse driver has been commented in CONFIG.SYS, Use WarpIN to uninstall all AMouse packages before beginning the update procedure. This should prevent the updater from applying an AMouse “update” thus triggering the conflict.
Workaround during update
If the system has already stopped with this IPE, reboot to the installer. Access the System Management console, and open the text editor. Open CONFIG.SYS from the root of the virtual hard disk’s boot volume (the update target), and comment (REM) any lines referencing AMOUSE.SYS. Close the editor, saving the file. Reboot from the hard disk to continue with the update.
This entry last updated: by