ArcaOS generally works fine in a virtualized environment, and in fact, because ArcaOS has such a small memory footprint, works well in high density configurations where one hypervisor must run several guests. However, there are some important points to consider before installing ArcaOS as a virtual machine:
- ArcaOS installs and runs properly only if the particular hypervisor provides supported hardware and if the virtual machine and the provided (emulated) hardware work correctly. This is not always the case.
- Running ArcaOS in a VM configured for EFI emulation (“UEFI mode”) is not recommended, and may have functional and performance problems. Best results are obtained by having the VM emulate the traditional environment that ArcaOS needs natively, rather than having ArcaOS emulate that traditional environment inside an emulated UEFI environment.
- Any issues running ArcaOS inside a VM are the fault of the VM, not the fault of ArcaOS, or Arca Noae. In other words, noting the first point, above, if something isn’t working in the virtualized environment, it is not for Arca Noae to provide “a more compatible driver,” but rather for the hypervisor developer to address the problem in the hardware emulation presented to the VM. Most VM’s have peculiarities which may need to be worked around. Again, this is a problem with the VM, not ArcaOS. Arca Noae is more than willing to work with a hypervisor developer to ensure that the hardware emulation is usable by ArcaOS.
- Arca Noae may be able to provide some assistance with setup (see the guides below), but we do not and cannot provide support for the VM itself. If an issue arises, you should be prepared to contact the hypervisor’s support channel.
- If you choose to run ArcaOS in a VM, expect that some things might not work as expected. For example, mouse and keyboard integration with the host may be substandard or nonexistent, or may require a particular keyboard procedure to release the VM’s control. Clipboard sharing may work in only one direction, or pasting text from one direction to the other might add (or remove) carriage returns. Transferring files directly from guest to host or vice-versa may require additional software or may not be possible at all. Network performance may be less than on bare metal installations. Performance may be worse with multiple CPUs than with one CPU. These are only a few examples.
- Keep in mind that just because a particular hypervisor version might run ArcaOS adequately does not mean the next one will. Upgrade with caution.
Oracle VM VirtualBox
VMware Workstation
VMware ESXi
Limitations due to lack of VMware Tools for OS/2
Parallels Desktop for Mac
On this page
VMware ESXi
6.5 U2, 6.7 U2
VMware does not officially support ArcaOS under VMware, however, they do recognize IBM OS/2. This is a good starting point (see below), but needs considerable modification, as will be discussed. the major key to success is the proper configuration of the IDE devices, specifically, the virtual hard disk as master on IDE controller 0 and the virtual CD/DVD as master (or slave) on IDE controller 1. In addition, it should be noted that the default (or only) virtualized audio adapter (Ensoniq) under VMware is not compatible with any driver shipped with ArcaOS. At the time of this writing, we have no workaround for this problem. If the Uniaud driver is auto-selected during ArcaOS install, the option to not install any audio adapter should be manually selected to avoid error messages during startup.
VM configuration
The following assumes the use of the vSphere web interface. The concepts are similar when using the vSphere Client, however.
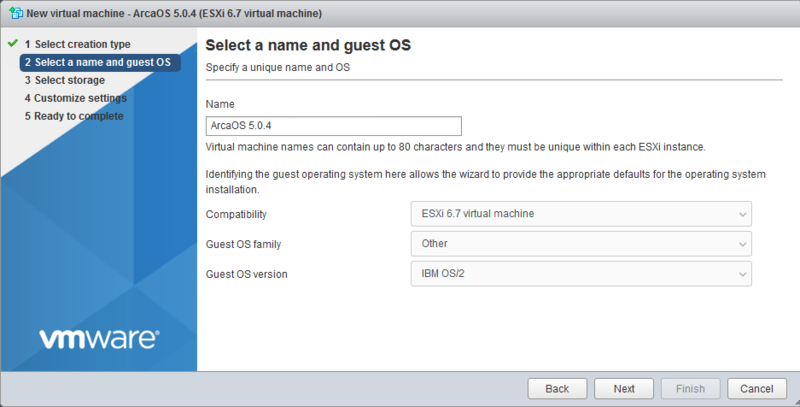
- Create new VM. Enter a name for the new VM and select Other for Guest OS family, and IBM OS/2 as the Guest OS version.
- Set Memory to minimum 256MB (512MB is preferred; 1024MB is recommended) and Hard disk 1 size (additional disks may be added, but for this example, use a single, small drive). Do not select more CPUs or cores than the host server, as these are not supported in the VMware ESXi environment (which actually reflects the host’s installed CPU manufacturer and model in the guest). In general, it is best to wait until after the installation completes to add processors and/or cores. On some systems, selecting more than one CPU may result in poor performance. IMPORTANT: Delete SCSI controller 0, as this is unnecessary, and can complicate the install.
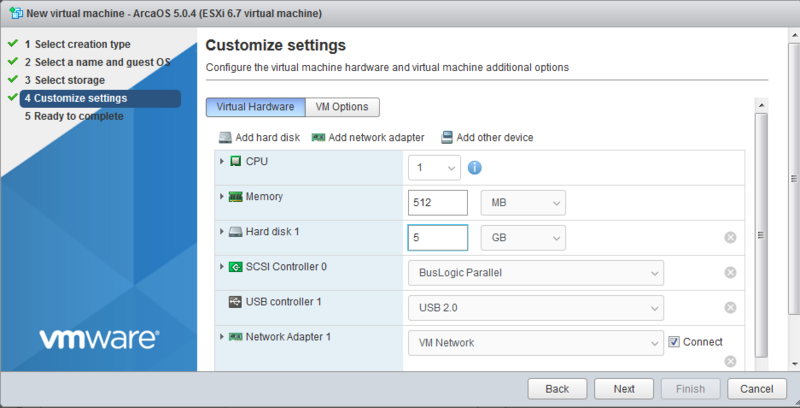
- The USB 2.0 controller is essential for proper virtual mouse connectivity. Be sure to keep it (it is also possible to attach a USB device in the local system for use by the VM).
- Change the Adapter Type for Network Adapter 1 to E1000. This is essential, as ArcaOS does not ship with a driver for the antiquated default adapter.
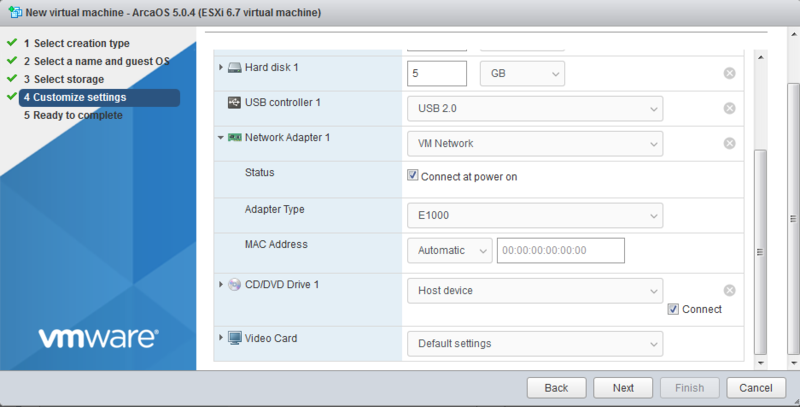
- CRITICAL: Change the Controller location for CD/DVD Drive 1 to IDE Controller 1, Master. (Note that Hard disk 1 defaults to IDE Controller 0, Master; these must be on separate controllers for a successful installation.) Mount the ArcaOS installation ISO either from the local DVD drive or upload to the ESXi server’s datastore, as pictured here. Ensure this is connected, so it then becomes the first bootable device.

Click Next to review your settings, and Finish to save the new VM. It is now time to boot into the ArcaOS installer.
ArcaOS Installation
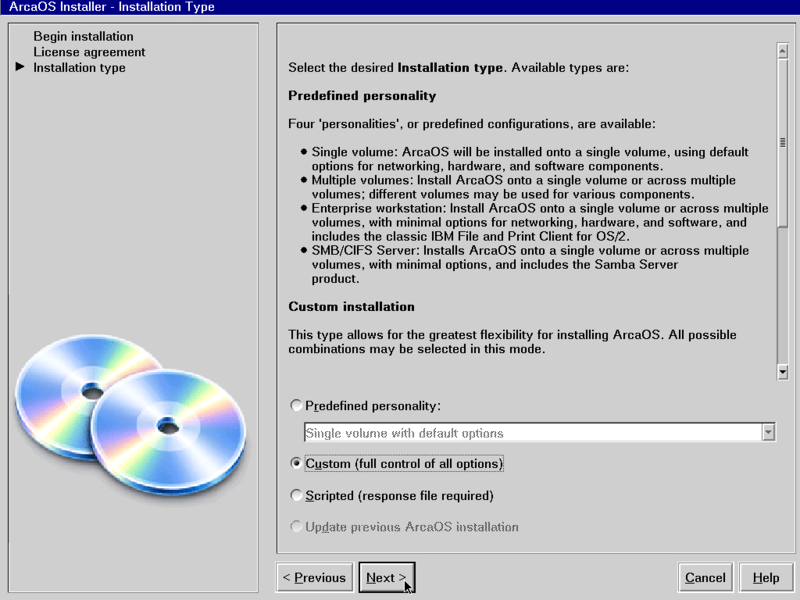
- Start the VM, and select the option to boot with default values, which are fine for this environment. Proceed to the Installation type page and select either a Predefined personality or a Custom installation. Here, we’ve selected the latter. Click Next to continue to the Target volume(s) page.
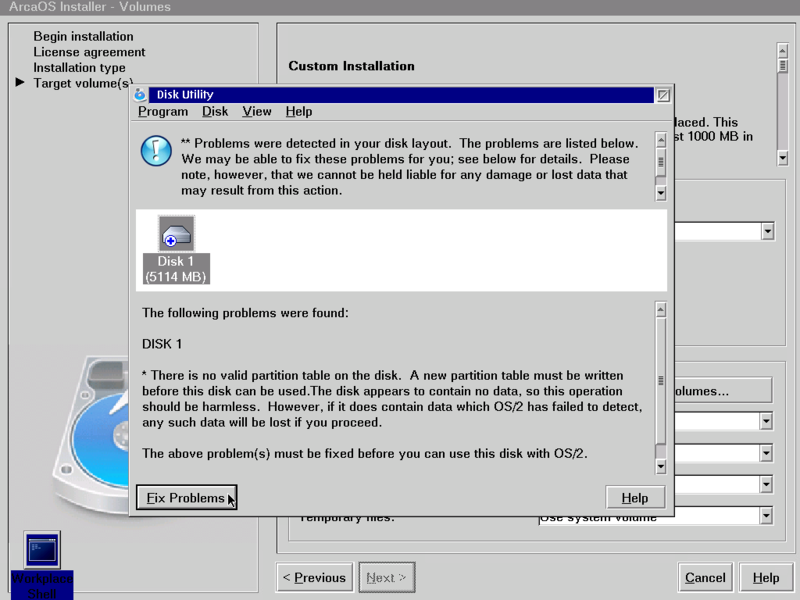
- At the Target volume(s) page, the Disk Utility will run, and determine that there is no partition table on the disk. Click Fix Problems, and follow the prompts to reboot the VM. Use Ctrl-Alt-Ins to reboot when prompted. Restart the installation exactly as before, and return to this page.
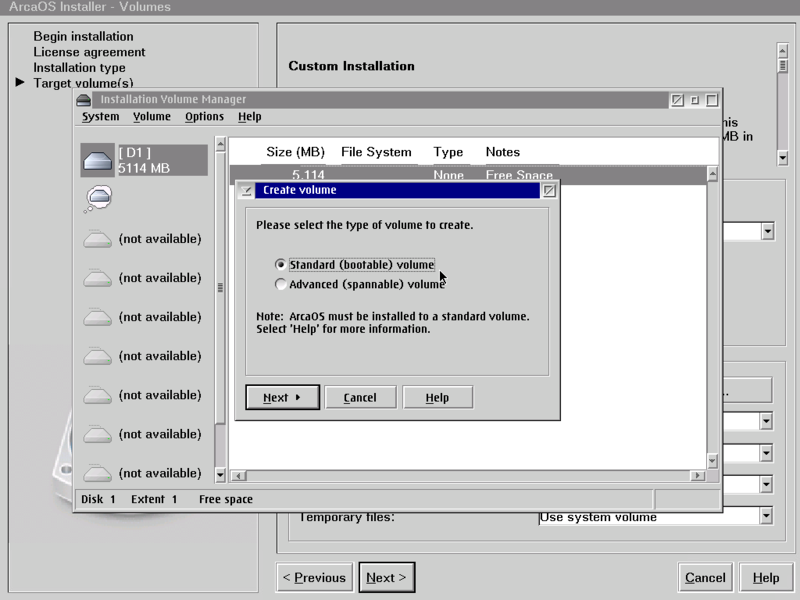
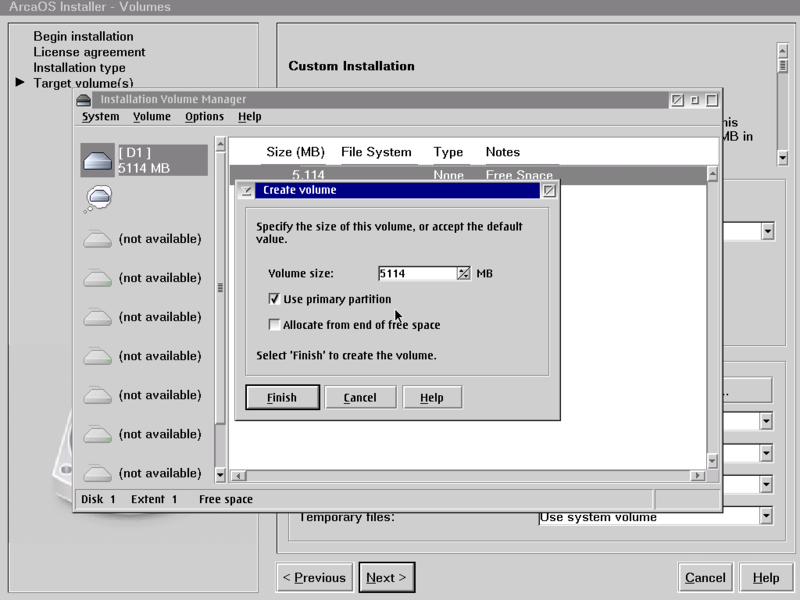
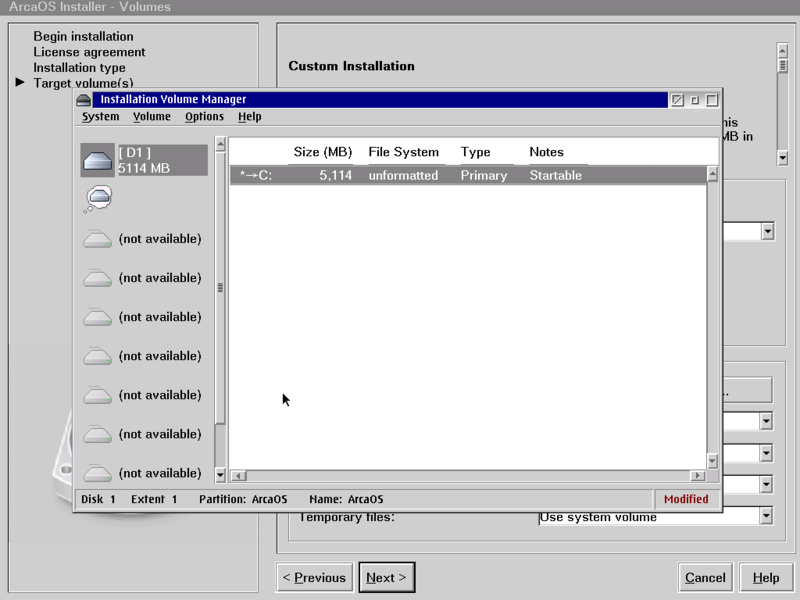
- Note the empty System Volume dropdown. Click Manage Volumes… to start the Installation Volume Manager to create a bootable volume. Do not use other tools (lvm, lvmgui, dfsee, etc.).
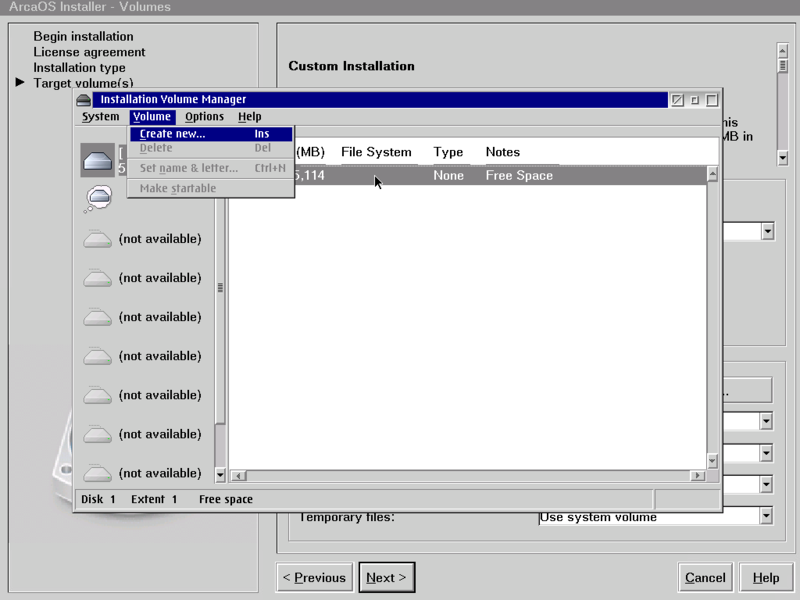
- For the purposes of this example, we will create a single bootable volume, assign drive letter C:, name it, and use all the available space in a primary partition. When done, close the Installation Volume Manager and save your changes.

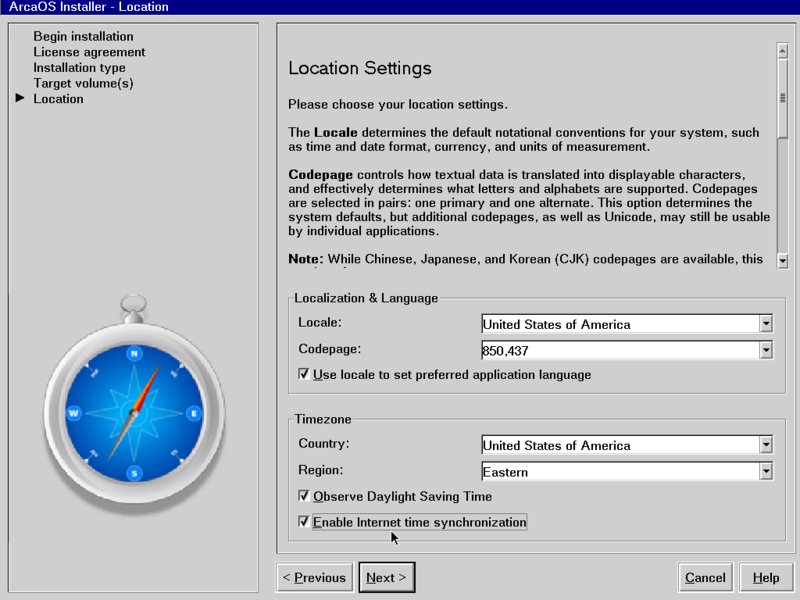
- Leave all ancillary volumes set to Use system volume, and click Next to set the locale and timezone on the Location page. Note that because VMware ESXi currently lacks VMware Tools for OS/2, it may not be possible for the VM clock to be set by the host. Check Enable internet time synchronization here and configure for a local or internet time source after the installation completes. Click Next to proceed to the Software selection and Hardware pages.
- At the Hardware page, ensure that no extraneous hardware has been selected (e.g., SCSI or audio adapter – see note above concerning lack of compatible audio adapter). Click Next to proceed to the Confirmation page to review your settings. Click Next to begin the installation.
Leave the Reboot automatically checkbox set, and allow the installer to complete Phase 1, count down, and reboot into Phase 2. Allow Phase 2 to boot from the newly-formatted hard disk, and continue copying files. Again, leave the Reboot automatically checkbox set, and allow Phase 2 to complete and reboot into Phase 3.
Phase 3 presents the finished ArcaOS desktop. Once the process completes, access the Clock Synchronization object in the System Setup folder to configure time synchronization. Your ESXi server may be configured to function as an NTP server. In that case, you may choose to add its address or DNS name (if local DNS is available) to the configuration, and select it as the time source. Configure the video resolution and/or color depth from the Screen object in the System Setup folder. Note that the ArcaOS VM must be rebooted in order to apply the new resolution and/or color depth.
Your base ArcaOS installation is now complete. For next steps, see Post-install Tips & Hints.
Note that most configuration options available to bare metal installs are also available here, such as multiple hard disks, multi-volume layouts, static IP vs dynamic, and even multiple network adapters (if so configured for the VM). Avoid multiple CPUs, SCSI, and above all else, do not chain a virtual CD/DVD drive on the same IDE controller as a virtual hard disk.
Limitations due to lack of VMware Tools for OS/2
There is currently no VMware Tools for OS/2. However with the AMouse software, mouse integration and clipboard support should work. The following issues may be encountered in either VMware environment:
- Limited range of video resolutions (specifically, standard VESA modes only).
- No file drag’n’drop.
- In the ESXi web GUI, no mouse control is possible. Use the vSphere Client (available through ESXi 6.5) or Workstation GUI, instead.
- If you want clipboard support to work in the VMWare ESXi environment, the following two settings need to be changed in the advanced setup to bypass the server security:
isolation.tools.copy.disable FALSE
isolation.tools.paste.disable FALSE
This applies only to the VMWare ESXi environment. The VMWare workstation environment works without this change.
Parallels Desktop for Mac
The Parallels knowledgebase appears to state that Parallels Tools are not available for [OS/2-based] operating system[s]. (The older versions of these tools which were available for OS/2 reportedly no longer function with newer releases of Parallels Desktop for Mac.)
This entry last updated: by